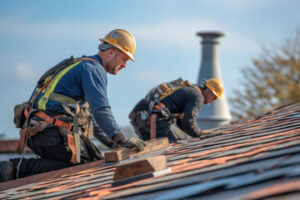
The roof is the most exposed part of any home, and it takes a beating from gale-force winds, hail, and other weather events. Keeping up with roof repair is essential to avoiding damage to the interior of your home.
Taking care of roofing repairs early is critical to saving money in the long run. If you plan to sell your home, Roof Repair NJ can improve curb appeal and value.
When a shingle becomes loose or damaged, water can seep under the surrounding shingles and cause moisture damage. Regular roof maintenance with touch-ups and the replacement of aging or weathered shingles can help prolong the life of your roofing system and prevent expensive leaks down the road. When you notice a damaged or loose shingle, carefully climb a ladder to the area of the roof where it’s located. Before starting the repair, make sure that any other loose shingles are secured to prevent further problems from developing in the future.
Locate the damaged shingle and use your flat pry bar to gently lift it and the shingle directly above it. Loosen and remove the nails from the shingle that’s holding down the one that’s damaged, then pull out the old shingle. If there’s a nail sticking up in the roof that wasn’t covered by the shingle you pulled out, use a utility knife to cut it off.
Before you place your replacement shingle, slightly round its back corners with your sharp utility knife to help it blend in better with the shingles around it. Slide the new shingle into the gap, and secure it to the roof with roofing nails driven through each corner. If you have enough shingle left over, apply it to the area around the damaged shingle to provide a solid seal to help keep moisture out of the house.
It’s best to replace the whole row of shingles when you have the chance, so that any areas that were missed by the damaged shingle won’t be exposed to the elements. If you have enough shingle to cover the entire area, apply a spot of roof cement underneath each tab to secure it in place.
Using your flat pry bar, gently lift the edges of the row above the damaged shingle to reveal the tabs. Stack another shingle on top, and secure it with the nailing strips to ensure that it’s nailed in properly. After all of the shingle repairs are complete, you can spray the roof with a waterproof membrane to protect it from moisture and other harmful elements.
Repairing Damaged Flashing
Flashing is the metal strips that protect roof edges, valleys and junctions between roofing and obstructions like chimneys, dormers and vent pipes. It is often prone to damage from exposure to the sun’s UV rays, rain and snow. Like shingles, it can develop holes, corrosion or cracks.
Unlike shingles, though, it is usually easier to repair flashing problems. Most of the time, small holes or corroded spots in flashing can be fixed with roofing cement or caulk. However, these are temporary fixes and should be followed by a professional roof repair technician.
Many flashing problems, especially around chimneys, develop from poor repairs or age and wear. Chimney flashing can also be prone to leaks if it’s not properly sealed during installation. This is because the mortar joints that hold the flashing cap in place can get loosened or crumble and allow moisture to seep underneath the flashing and into the house.
While it is possible to repair some of these issues on your own, you should always follow all proper safety precautions when working on the roof. This includes wearing the right safety gear, having a sturdy ladder and being cautious of your surroundings. You should also always have someone spot you while you are on the roof and to help with any heavy lifting or stepping.
If you do spot a problem with your flashing, don’t delay in making the necessary repairs. Especially during the winter, snow and ice can build up on flashing, weakening it or forcing it through gaps in the shingle layer. Holes, cracks and dents in flashing should be repaired immediately to prevent the loss of water-tight integrity of the roof.
Signs of flashing problems can be seen inside the house as well, particularly near windows and fireplaces. Leaks can also occur in the attic or crawl space if flashing is not adequately sheding water from the roof. Water penetration can cause rot in fascia boards or deteriorate the caulk around windows and corners. These signs indicate that it is time to call a roofing repair specialist.
Repairing Damaged Vents
Vents are not only important for your roof’s function, but they can also add to the look of your home. When your roof’s vents are damaged, however, they can become a source of moisture leakage that can damage the ceiling, walls, insulation and other components of the attic or crawl space. If left unchecked, this can lead to mold, mildew and other health concerns in the spaces below. In addition, a leaking roof vent can cause the wood that makes up your attic to rot.
Depending on the severity of the problem, there may be a number of different repairs needed to fix your vents. For example, a cracked vent boot or a loose vent seal may be able to be repaired with some caulk. For more serious problems, the roof will need to be inspected and the vents replaced if necessary.
Leaks around vents often occur due to damaged flashing, which can be easily fixed by replacing the flashing and applying new cement. Vents can also get clogged with debris, which can be prevented by regularly inspecting and cleaning your roof vents.
If you find that your vents are leaking water, it is important to act quickly to repair the problem. If you aren’t comfortable tackling this job yourself, a professional roofing contractor can complete the task for you.
Before you start any work on your roof, it’s a good idea to have someone with you to help keep you safe and to ensure that the job is done correctly. When working on your roof, it is very easy to fall or get hurt if you’re not careful.
Before you do any roof work, it’s a good idea to get up into your attic or crawl space and take a close look at the condition of the vents. Start by pulling back the shingles and looking for any signs of water leakage around the vent pipe collar. If you see any cracks or gaps in the metal, it’s a good idea to replace the pipe collar. You should also consider replacing any nails securing the collar with rubber washer screws to provide a more durable and water resistant seal.
Repairing Damaged Gutters
Gutters are an important part of the roof system. They help channel water away from the building and prevent leaks, rust, and dirt infiltration. If a gutter becomes damaged or clogged, it can lead to expensive water damage and mold growth.
The first thing to do when repairing a damaged gutter is to remove any debris and clean the area. This will allow you to spot any larger structural issues and repair them accordingly. For example, a leaky gutter could just need a patch or it may need to be replaced entirely.
Wearing gloves, scoop out any accumulated debris from the gutters using a gutter scoop or garden trowel. Then, scrub the gutters with a wire brush and rinse them off with a hose. Next, use a gutter sealant to apply a thin layer over the hole or crack. Allow the sealant to dry and then reattach fascia hanger brackets if necessary.
A damaged gutter can also be fixed by replacing a section of the gutter with a new one cut to size with tin snips or a saw. The new section should overlap the old one by a quarter inch.
Leaking gutters are caused by a variety of things, from a clogged downspout to loose gutter screws. Standing water can corrode metal gutters and pummel the soil or foundation below the house. Loose gutter screws create stress on the gutters, causing them to shift and pull away from the house. This can cause rotting fascia and wood trim around the edge of the home.
If you notice that your gutters are leaking even when there’s no clog, it’s likely time to replace them. You may also need to realign the gutters if they’re positioned incorrectly and aren’t at an angle that helps with drainage. This is easy enough to do with a laser level and can be done during the same time you’re fixing other parts of your roof. In the end, your repaired or replaced gutters will help protect your roof and your home’s foundation for years to come. They’ll also add to the curb appeal of your home.