How Much Does a Septic Tank Cost?

A septic tank is a buried, water-tight container that receives all wastewater from household plumbing. The wastes in the tank settle or float, with heavy solids sinking to form sludge and oils and grease floating to the top as scum.

The liquid wastewater, called effluent, exits the tank through a pipe into a drain field where soil and microbes filter it. Regular inspection and pumping are critical to septic tank maintenance. For more information, click the Website to proceed.

When used properly, a septic tank offers a reliable alternative to municipal sewer systems. However, improper use can cause serious problems. To avoid these, you should learn some practical strategies that will ensure your septic system works as it should for years to come.

All drains in your home lead to the main sewer line that slopes downward toward your septic tank. Every time you flush a toilet, take a shower or wash clothes, wastewater enters the sewer line and flows into your septic tank. Bacteria break down this sewage, separating it into water and sludge.

Solid waste settles in the bottom of your tank, while fats and greases drift to the top. The liquid waste exits the septic tank through an outlet pipe, which is sized according to your household needs. A baffle keeps solids from clogging the outlet pipe or the drain field.

A baffle is also placed in the inlet drains to prevent the flow of non-biodegradable waste items into your septic tank. These include cigarette butts, cotton buds/swabs, menstrual hygiene products, condoms and cooking oils. These waste materials can clog and overflow your septic tank.

If you don’t want to risk these items entering your septic tank, consider installing inlet drain screens. These are available from most hardware stores.

Chemical cleaners can wreak havoc on a septic system, killing bacteria that breaks down solids in the tank and pipes. It’s better to use natural cleaning products that don’t contain harsh chemicals. Also, don’t flush sanitary products down the toilet, as these can cause the septic system to overflow and back up into your home. This can be very dangerous and expensive to fix.

All water from your home runs through one main drainage pipe that leads to the septic tank underground. Once inside, the septic tank holds waste for enough time so that solids settle to the bottom and oil and grease float to the top. The septic tank also provides some level of wastewater treatment by adding bacteria that break down the remaining solids and liquids. When the septic system is functioning correctly, liquid wastewater (effluent) exits the septic tank through pipes into the drain field.

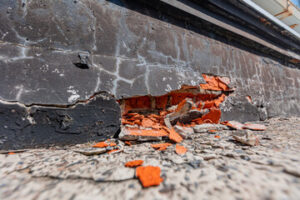
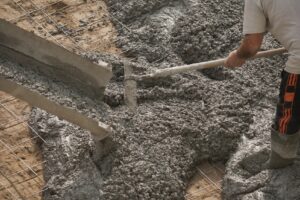
The septic tank is normally made of concrete, fiberglass, or polyethylene to ensure that it’s not prone to cracking while underground. It’s important that the septic tank is located well away from homes and driveways so that it doesn’t leak.

Inside your septic tank, solid waste is separated into three different layers: sludge, effluent and scum. Sludge is the solid waste that sinks to the bottom of a septic tank where natural anaerobic bacteria break it down. Scum is the lighter layer that contains oils and fats from food and soap. It will often float to the surface as it decomposes. Bacteria in the septic tank can be boosted with an enzyme additive that helps the process along.

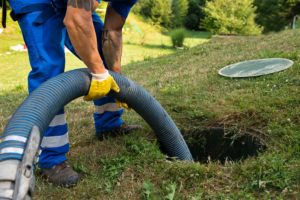
Once the septic tank is full, it will need to be pumped. Your professional will be able to help you determine how often your tank needs to be pumped.

It’s best to keep the grass mowed and to avoid parking on the area around the tank, absorption field, and distribution box. This helps to reduce the chance of damaging your septic system by compacting soil and blocking flow. It’s also a good idea to map out your septic system or have it marked with stakes so that you can safely locate system components when doing yard work or performing home maintenance.

A septic tank is an essential component of a home’s wastewater treatment system. The water that leaves your house goes through the tank, which separates into three layers: solid waste (sludge), liquid effluent and scum. Solid waste sinks to the bottom of the tank, where bacteria decompose it over time. The middle layer of liquid effluent exits the tank through underground perforated pipes into a drain field or leach field, where gravel and soil filter it as it sinks to the ground.

Bacteria are the key to how a septic system works. They break down waste, creating a slurry of sludge and wastewater that is clean enough to percolate into the soil. This is a natural process, but bacteria do not always work quickly or efficiently.

Adding septic tank additives can help speed up the process. Keeping the tank free of large, solid waste items also helps ensure that bacteria can operate properly. Some common septic tank-clogging items include cigarette butts, condoms and sanitary napkins. Other items that can clog a septic system include cotton balls, tampons and grease.

If you plan to sell your home, you should make sure the septic system is functioning properly before placing it on the market. You can hire a professional to perform an inspection and a septic tank pumping before you list your property. Some sellers prefer to have a contingency in the contract for a septic inspection to protect themselves against potential problems with the septic system. In these cases, the buyer must submit a satisfactory septic tank inspection report to complete the sale. A septic tank is a sealed precast concrete box, typically located underground outside your home. You can usually locate it by looking for a lid that’s flush with the ground.

Typically, the biggest cost is the labor of installing the septic tank itself. However, there are other factors that can influence the total price tag of a new septic system including the tank size and material, local regulations, and land surveying. Generally, the best way to determine how much your septic system will cost is to contact multiple septic contractors in your area and receive detailed quotes. This will help you compare rates and find a contractor within your budget.

It’s essential to remember that a septic tank is not a DIY project and should always be installed by a professional to prevent serious, costly mistakes. It’s also important to consider ongoing maintenance costs. These include regular pumping (which should be done every 3 to 5 years) and periodic sludge removal or desludging of the tank. When the sludge layer gets too high, it can block the drains in your home and result in wastewater backups. Other signs that your septic system needs attention include a strong odor, slow-running drains, and water puddles in the yard.

A septic tank can be made of fiberglass or concrete, with concrete being the more common choice. Fiberglass tanks are a bit more affordable, but they tend to deteriorate over time and may require more frequent repairs or replacement. When deciding between a fiberglass and concrete septic tank, it’s important to weigh the pros and cons of each option to determine which is the right fit for your household and property.

To reduce the strain on your septic tank, it’s a good idea to be mindful of water usage and to only flush toilet paper and human waste. Coffee grounds, diapers, and lint from synthetic clothing can clog the drains and septic system, as can grease and harsh chemicals. It’s also helpful to schedule regular septic tank inspections to identify problems and potential issues before they become costly.

All of your household waste and sewage flows through pipes into the septic tank. Solids, called sludge, settle at the bottom of the tank while fats and oils rise to the top. Bacteria in the tank slowly breaks down some of these solids over time. Liquids, called effluent, flow out of the tank into your drain field.

When solids build up in the septic tank they can overflow into the absorption field. This oversaturation can cause the septic system to malfunction or even back up into your home. The best way to avoid this is to have the septic tank pumped regularly.

Your septic tank should be pumped when the sludge layer is one-third full. It’s also a good idea to have your septic tank inspected at least once a year. The septic inspector will be able to recommend an appropriate pumping schedule for your tank.

To keep the septic tank from filling up too quickly, try to limit how much you use water in your house. This includes showers, toilets, washing machines and dishwashers. Also, try to spread out laundry sessions throughout the week rather than doing several loads all at once. You can also help by using less toilet paper and avoiding putting anything down the drain that doesn’t decompose, such as cigarette butts, left over medications, handwipes, tissues, plastics and kitty litter.

It’s a good idea to have septic tank risers installed to make the process of pumping and inspections more convenient. This makes it easier for the professional to get into the septic tank and can save you the hassle of digging in your yard each time. Having the risers installed can also prevent your yard from getting dirty when the septic tank is emptied.

What You Need to Know About Water Damage Restoration

If water damage isn’t addressed promptly, it can lead to rot, warping, and weakened structural components. The first step is removing the excess water and drying out the area.

Proper cleaning and drying prevents the spread of mold and mildew, which can cause health issues for occupants. It also helps save cherished belongings like furniture, books, and sentimental photographs. Contact Water Damage Restoration Utah now!

A water damage restoration professional needs to be certified in order to provide the best possible service. This certification shows that they have completed the necessary training to understand the water restoration process and how to repair different materials and structures in a safe manner. It also demonstrates that they are qualified to take on a project and complete it according to industry standards.

As a result, if you are looking for a water damage restoration company to help you in a crisis situation, ask about their certifications before making a decision. You should be able to find information about their qualifications online or by calling the company directly.

Another important question to ask is whether or not the company has a license for their work. This is especially true for commercial clients, as there may be stricter requirements for these types of jobs. You can check this by visiting your local business licensing website or calling the state licensing office directly.

In addition to a license, it’s a good idea to look for certifications from reputable organizations such as the Institute of Inspection Cleaning and Restoration Certification (IICRC). This organization offers courses both online and in-person, which can give professionals a deeper understanding of the water restoration process.

Water damage restoration involves a lot more than just pumping out the water and replacing materials that are damaged. It’s also important to treat contaminated areas and ensure that all moisture is removed from the structure before it’s closed up again. This is a process known as dehumidification, which is done using specialized equipment.

A qualified water damage restoration professional will be able to identify the type of water in the property, which is crucial for proper treatment. This usually involves a visual and olfactory inspection. Clean water is clear and has no odor, while gray water is slightly dirty and often comes from appliances like washing machines. Category 3 water has dangerous pathogens and is usually from sewage backups or natural floods. This type of water requires special cleaning and should only be handled by trained and certified technicians.

The water damage restoration industry involves complex projects that require a combination of technical knowledge and problem-solving skills. Hiring managers will ask applicants about their most challenging restoration projects and how they overcame challenges on those jobs to deliver a high-quality project. This helps hiring managers assess the candidate’s ability to handle difficult situations and learn from past experiences to improve their work.

The first step in any water damage restoration job is to inspect the property and determine how much damage has been done. This includes looking for structural damage and identifying any electrical hazards caused by the flood. It is also important to look for any hidden pockets of moisture in walls and other hard-to-reach places. If left untreated, moisture in walls and carpet can cause mold to grow, which can then lead to further problems with the structure of the building and a dangerous living environment for the occupants.

Once the water has been removed, the team will begin to dry out the affected area. This is a process that takes a lot of time and patience. The team will use specialized equipment to monitor and control humidity levels, which is important for preventing the development of mold and other harmful microorganisms. They may also use psychrometric calculations to adjust airflow and temperature in order to create optimal conditions for evaporation.

Hiring managers will also want to see that the company has experience in multiple aspects of construction, including water damage restoration. A good water damage restoration contractor should have a background in plumbing, roofing, remodeling, ground-up construction and insurance assistance. They should also have extensive experience working with different types of materials, including drywall, hardwood floors and ceilings.

The most important thing to remember when choosing a water damage restoration service is to ask for references and check reviews. Many salespeople in this industry receive commission on their contracts, so they may be more interested in a large paycheck than what is best for the customer. Asking for references and reading reviews will help you find the most trustworthy and experienced service for your needs.

Water damage restoration is a complex process that requires the right equipment. Professionals specializing in the field have years of experience and unique expertise to fix the many problems water damage causes in a cost-effective, safe, and timely manner.

The first step in water damage restoration is assessing the damage. This involves looking for signs of water damage like water stains or swelling in walls or floors. It also includes determining the source of the water, which may be a sewage back-up or flood from a natural disaster. Then the remediation process starts, which includes removing damaged items and drying structures and contents.

This can be a difficult task, as many items are not salvageable. Items that have sat in standing water for an extended period of time are often ruined and will need to be replaced. This can include furniture, carpets, wallpaper, and other decorative items. It’s important to replace these items quickly, as mold can begin growing in a short amount of time.

Equipment used in water damage restoration includes moisture detection instruments, dehumidifiers, airmovers, and structural dryers. Moisture meters are essential tools because they can identify moisture levels in specific areas. They are especially useful in detecting hidden water damage, such as behind walls and under floors. They can also be used to measure moisture levels after water reduction tasks are completed to ensure that they have been successful.

Dehumidifiers are important because they remove the excess moisture from the air in flooded buildings. Standard dehumidifiers are not as effective as the commercial-grade LGR (Low Grain Refrigerant) models that professional restoration contractors use. These dehumidifiers have an innovative design that allows them to dehumidify more efficiently and quickly than conventional units.

During the remediation process, it is essential to wear personal protective equipment (PPE) like gloves, masks, and goggles. This is because contaminants from the water and mold can be dangerous to health. It’s also important to use the correct cleaning chemicals for different materials.

It’s also important to have the right tools to remove and replace damaged items. For example, water damage specialists need to have a large trash bin to contain debris, and an Equipter RB4000 is the perfect choice. This waste container has a 12 ft lift, a 4,000-lb capacity, and a hydraulic tailgate that makes it easy to load, drive, and dump.

If you have the technical know-how and the entrepreneurial spirit, starting a water damage restoration business can be a rewarding endeavor. However, it’s important to take several factors into consideration before launching your startup. This way, you can position yourself for growth and long-term success. By doing so, you can ensure customer satisfaction and achieve profitability.

The first step in starting a water damage restoration company is building a strong online presence. This means creating a professional website, optimizing it for search engine optimization (SEO), and actively seeking out customer reviews and feedback. In addition, you should train your employees to deliver superior service and prioritize customer experience. By providing an excellent customer experience, you can build trust and loyalty with your customers and improve brand visibility.

Water damage restoration is a complex process that requires the use of advanced tools and equipment to safely restore damaged property. The best way to ensure the safety of your employees and clients is by hiring certified, licensed professionals. Not only will this help you reduce liability risk, but it will also help you avoid costly mistakes that could lead to additional property damage and loss of revenue.

Timely water damage restoration is critical, as it prevents further damage to your home or business and preserves your belongings. It can also minimize health risks and reduce repair costs. However, many homeowners and commercial property owners try to do it themselves using do-it-yourself methods such as pumping out the water and cleaning the affected area. While these techniques may work temporarily, they aren’t enough to address the extensive water damage that has caused serious structural and electrical problems.

Fortunately, there are professional water damage restoration companies that specialize in these areas. They can provide you with a detailed water damage assessment and recommend the right restoration services to fix your property and restore your belongings to pre-loss condition. In addition, these companies can help you navigate the insurance claim process and negotiate with your insurer. They can even arrange for a temporary relocation while the repairs are being made.

Asbestos Removal – How to Safely Remove Asbestos

Depending on how asbestos was applied and its location, it may not present a risk to the public. However, maintenance operations or renovations that disturb it may release fibers into the air that others can inhale. For more information, Click Here to proceed.

Licensed abatement professionals have the experience, equipment, and knowledge to handle asbestos safely. They follow federal and local laws.

Before starting any work, it’s important to identify asbestos. The best way to do this is by contacting a licensed asbestos assessor. They’ll be able to tell you whether or not a material contains asbestos based on the property’s history and location.

Asbestos was used in some building materials before it was partially banned in the 1970s, and many older structures contain it. Some common asbestos-containing products include decorative plasters, fireproofing, vermiculite insulation (which looks like shiny accordion-like pebbles), and thermal insulation wrap on pipes and boiler systems.

If the material is in good condition and will not be disturbed, it’s generally safe to leave it alone. However, suppose it’s slightly damaged, or you plan to make changes in your home that will disturb the material. In that case, you must contact an industrial hygiene firm for a full visual inspection and sample testing.

It’s also worth noting that asbestos fibers are 50 to 200 times thinner than human hair and can be difficult to see with the naked eye. That’s why it’s often more noticeable when the fibers clump together. Before collecting samples, patch the area with duct tape to prevent fiber release and send them to an accredited lab for analysis. You can find a list of laboratories on the NVLAP website. Also, check with your local health, environmental, or building inspectors to find out if you need to notify them of the work.

Before starting any work on the asbestos, it is important to seal the area that is being worked on. This will help to prevent any of the asbestos fibers from becoming airborne and causing damage to other areas of your building. You can do this by wetting the area with a garden sprayer or regular spray bottle filled with water and a few drops of dish detergent. This will reduce the surface tension of the water and allow it to penetrate any loose asbestos fibers more easily. You should also use commercial products designed to seal small areas of damaged asbestos material, such as calico wrap or elastomeric coatings.

Once the area is sealed, the asbestos professionals will begin to remove any of the asbestos. They will carefully remove the materials with hand tools and use a specialized vacuum to clean any remaining dust from the area. Once they have removed the asbestos, they will seal the area again to ensure that any lingering asbestos cannot escape into the environment and cause further problems.

Removing or encapsulating asbestos materials is often necessary, depending on their condition and the likelihood of being disturbed. Sometimes, encapsulation is a safer option than removal if the ACMs are in low-risk areas or are part of historical or valuable structures. However, removal is generally the best and most appropriate option if the ACMs are highly damaged or likely to be disturbed in the future.

Once a professional has tested your asbestos, they can suggest the next steps. They may recommend abatement, which involves removing hazardous materials and cleaning the area, or encapsulation, which covers the material with a sealant to prevent it from breaking apart and becoming airborne. During both processes, professionals will use plastic sheeting and duct tape to seal off the work areas from other parts of your house or commercial space. They will also turn off heating and cooling systems to avoid spreading contamination through the system.

Before starting to work, the contractor should wet all asbestos waste using a sprayer that creates a fine mist. Wet fibers don’t release into the air as easily and are easier to clean. In addition, the contractor should put all asbestos-contaminated material into plastic, leak-proof containers and double bag it. The containers should be marked and labeled with an asbestos warning, and they should only be taken to landfills approved for the disposal of asbestos waste.

The contractor should also establish a clean changing room for their employees. The room should have a locker or an area for storing equipment and personal protective equipment, which must be cleaned before leaving the regulated area. They must also use the clean room to remove and discard their contaminated work clothing before showering and changing into street clothes in a decontamination chamber or other clean rooms.

Before taking any asbestos samples, wet the material with a fine mist of water with a few drops of detergent. This will reduce the release of fibers. Taking a sample from dry asbestos material, such as pipe insulation, is less hazardous but requires special safety precautions. Cover a small material area with a plastic sheet and shut down the heating and cooling systems if it needs to be sampled. Wet the material with a fine mist or sprinkle it with water/detergent before sampling.

If friable asbestos (material that can be crumbled by hand pressure) is disturbed, the fibers may become airborne and pose an inhalation hazard. Non-friable ACM is more difficult to damage but can still be released if scratched or cut.

The most common way to remove asbestos is to hire a professional contractor. It is the safest option, as professionals know what they are doing and can properly handle any necessary cleanup procedures to protect your health. They also have the equipment and expertise to prevent contaminated debris from spreading to other areas of your home during removal. Typically, a pro will seal off the work area with plastic sheets and create negative air pressure with a fan to limit the further spread of asbestos fibers. In addition, they can safely dispose of asbestos waste at an approved facility if required.

When asbestos fibers in the air are inhaled, they can enter the lungs. The body’s natural defense systems remove many, but others may bypass those defenses and lodge deep within the lungs. Those fibers can cause asbestosis, lung cancer, and mesothelioma. Strict regulations exist to prevent people from performing DIY asbestos abatement projects. People who violate those regulations face fines and other penalties.

All asbestos-containing waste must be double-bagged in 6-millimeter plastic bags before it is transported to a disposal site. It is also important to get all materials before bagging them, as this minimizes the risk of asbestos fibers escaping if the packaging is damaged. Additionally, all workers must wear appropriate protective gear and follow all other decontamination procedures.

While this does not eliminate all risks, it significantly reduces them. It also eliminates the need for waste to be transported long distances, which helps reduce costs. Additionally, recycling methods may reduce the volume of waste by 50% or more. This is helpful to landfills since disposal pricing is often based on the volume of garbage.

It is important to check with local health, environmental, and other officials for information about proper handling and disposal of asbestos. It is best to hire a professional for any asbestos-related work. This ensures that the work is performed correctly and safely. It also provides peace of mind that the asbestos-containing materials are handled and disposed of by all regulations and laws.

When a professional is working on removing asbestos, they will need to take extra care not to spread the material into other areas of your home. They should cover all openings to the work area with plastic sheeting and duct tape and turn off your heating and air conditioning system to prevent dust from escaping. They should also use duct tape to seal their plastic gloves when removing material and throw the wraps away immediately when they are done.

The contractor should also wet the asbestos with a sprayer before removing it. This will make the fibers less likely to float in the air and make it easier for them to clean up. Then, they should use a damp rag to wipe any remaining residue from their hands and equipment before leaving the regulated area. If they reuse rags, they should be rinsed and cleaned before using again. They should also wrap plastic drop sheets by folding them up and down rather than scrunching them.

Once they’ve completed their work, workers should go through the waste container pass-out air lock or the decontamination enclosure to exit the regulated area. They should then shower in the decontamination area and wash their hands, face, head, and fingernails. Once they’re dry, they can enter the clean changing room and wear street clothing.

Foundation Repair Solutions

In this era of DIY, many homeowners take on home improvement projects on their own. While this is a great way to save money, it can be dangerous regarding foundation repair.

Foundation Repair

DIY solutions like spreading self-leveling compound over a concrete slab are not only ineffective but can actually make the problem worse. Fortunately, experts have the proper tools and knowledge to repair serious issues. Contact Sugar Land Foundation Repair Solutions for professional assistance.

Drilled concrete piers are used in foundation repair and new construction projects that require a deep foundation due to unstable soil conditions. You might also hear them referred to as caissons or cast-in-place piles. Essentially, they transfer the weight of your house into a stronger, more stable soil layer. They’re particularly useful in older homes or those located in a climate where clay soil is common.

This solution is very cost-effective and often less costly than slab jacking or high-density foam. It also provides the benefit of keeping your home’s crawl space intact. This allows for easier access to pipes, wires, and ducts that run through the area and allows foundation professionals to check for signs of moisture build-up and structural damage.

When a poured concrete pier is used, the first step of the process is excavation. A hole is dug next to the existing foundation at a depth that’s been determined by your geotechnical engineer. This is done using an auger drill, a piece of equipment that can dig holes up to 35 feet deep. Once the hole is excavated, steel reinforcement is inserted into the drilled shaft. This helps the pier resist both lateral and vertical stresses. Then, concrete is poured over the steel to finish the job.

Another option is to use hollow, cardboard Sonotubes that are filled with concrete and then steel is inserted in the center. This type of monolithic pier had a short-lived heyday and is now rarely seen in newer homes. A more modern approach involves a more permanent solution known as stacked concrete piers, also referred to as “shotcrete.” This method starts with the same basic excavation steps but, instead of digging a hole and inserting a concrete form, a shotcrete crew sprays a mix of water and cement onto the existing foundation walls. This forms a strong, waterproof coating that is extremely durable.

Once the concrete has cured, the shotcrete coating is removed and hydraulic bottle jacks are placed on top of the concrete piers. The team can then begin raising your home and leveling the structure. As the foundation is lifted, the piers will begin to stabilize and prevent any future shifting or movement.

Concrete Pile

Concrete piles are vertical cylindrical piles that are pushed into the ground, usually to a point that is called “the point of refusal.” These piles have been used in construction for many years and are especially popular when building the heaviest structures like skyscrapers and highway bridges. When used for foundation repair, they are primarily utilized as support for commercial buildings and residential homes.

The reason why concrete piles are so widely utilized for foundation repair is that they require little to no excavation, allowing for a much quicker and cheaper solution. Also, these concrete cylinders can be installed in tight spaces and can be made to fit the unique needs of your home.

But while these concrete cylinders may be cheap and easy to install, they are not a permanent or effective foundation repair solution. One of the main reasons why these foundation piers fail is because they do not provide a solid enough base for your home, and they do not offer an effective way to transfer your house’s load to the stronger soil or bedrock that lies beneath the weaker top layer.

So, why do so many foundation repair contractors continue to use these squat, chubby piles as an affordable and quick foundation repair solution? They do so because of the high profit margin that they yield. These foundation repair contractors typically charge between $350 and $700 for each concrete pier that they install.

When installed correctly, concrete piles can be an effective and long-lasting foundation repair solution. However, to ensure that your foundation repair company is using this method effectively, it is important to know how these chubby piles are supposed to be installed.

In most cases, these piles will be drilled into the ground with a hydraulic machine, and then a concrete cap is placed over the top to ensure that they are protected from the elements.

These piles are a great choice for the Dallas area because our ground soil is prone to shifting and expansion, which can cause major problems with your foundation. This hybrid system uses a combination of steel and concrete, allowing it to penetrate deeper into the soil. This allows for a stronger and more durable foundation than other repair methods, while still allowing the piles to be transported easily and spliced together to create longer piles as necessary.

Slab Jacking

When a concrete slab is poured over poorly compacted soil, it may sink as the ground beneath erodes. If left untreated, sunken concrete can cause serious damage to the home or business. Slabjacking, or mudjacking, is a foundation repair method that involves injecting a material into the ground under the slab to raise it back to its original position. It’s commonly used for slab foundations, patios, driveways, and garage floors that have settled over time.

In order to use this technique, a pattern of holes is drilled into the area that needs to be lifted. Then, a synthetic lifting solution is pumped through these holes to fill the space and raise the slab. The concrete is then topped with a layer of new concrete to finish the job. This type of work is typically performed in warmer weather since the mud can be hard to work with when cold.

The main advantage of this method is that it doesn’t require excavation or breaking up the old slab, making it an environmentally friendly option. However, mudjacking isn’t as effective as other methods for leveling or raising sunken concrete. This is because the mud mix is often only a temporary fix. Depending on the soil, the mud can wash away or sink into the ground again, leaving the slab still sunken.

Another concern is that mudjacking does not address the root of the problem, which is shifting soil. This is often caused by long droughts and can lead to the movement of a house or building over time. Mudjacking is also a labor-intensive process, since the contractor must drill many holes in order to raise the concrete.

In contrast, polyurethane foam concrete leveling is a faster and more convenient method that provides a permanent solution for sunken concrete. It involves injecting a two-part chemical mixture into the ground underneath the slab to trigger a chemical reaction. The foam then expands and lifts the concrete. Injection is done through a series of small holes, similar to those used for injection insulation. This is a less invasive option and can be completed in one day.

Helical Piers

Helical piers are a powerful solution for foundation stabilization. They can be used to lift and stabilize a foundation in existing homes, as well as build new foundations in soil conditions that are not appropriate for traditional concrete piers. In general, helical piers are more flexible and versatile than other types of foundation piers, such as push piers. This allows them to better adapt to a variety of soil conditions and to accommodate heavier structures.

Like many advanced structural work, helical piers require some advance planning and preparation to ensure a successful project. This is especially true if the work requires extensive excavation, heavy machinery or concrete pouring. However, these factors do not prevent professional helical pier installers from performing this work in an efficient and timely manner.

The installation process begins with the Olshan team identifying helical pier locations for each home. This is done by examining the condition of the foundation, as well as analyzing soil conditions in the area. Once the helical pier locations are determined, each pier is driven into the ground with portable driving equipment until the pier reaches its predetermined torque capacity. This step is critical to ensure that each helical pier will be able to support the weight of the structure above it.

Once each helical pier has reached its load-bearing capacity, the top of the pier is connected to a bracket that is attached to the foundation wall. Then, the weight of the structure above is transferred to the helical piers through a hydraulic system. This transfer of weight reduces stress on the foundation, which in turn helps to stabilize the building and correct any heaving or sagging problems.

When helical piers are installed properly by an experienced professional, they can provide long-lasting stability for a wide range of residential and commercial buildings. This is especially important in areas of the country that experience diverse soil conditions. If you are concerned about the stability of your home or business, contact a foundation repair specialist in your area to learn more about helical piers and how they can be used to correct your foundation.

How Is Concrete Made?

Concrete is one of the most important building materials in many structures, from skyscrapers to retaining walls. It has remarkable strength and can endure great loads. It also resists fire better than steel. For more information, you can visit Charleston Chimney Repair to proceed.

It consists of different sand, gravel, and cement proportions and can include additives to achieve specific goals. Once mixed, it undergoes a chemical reaction called hydration.

Concrete comprises four key ingredients: cement, aggregates, and water. The water is the critical ingredient because it forms a paste that glues the aggregates together and causes the concrete to harden through hydration. For the hydration process to work correctly, water must be pure. This is because impurities can cause side reactions that weaken or interfere with hydration, resulting in poor concrete.

The proper quantity of water is measured by a test called the slump. This test involves packing wet concrete into a bucket (not just any bucket; one made specifically for this purpose) and tipping it over like you are making a sand castle. The amount of slump that develops indicates if the concrete has too much or too little water. For best results, it is recommended that a specific slump be used for each different type of concrete mix.

Concrete is usually designed to have an exact slump and cement-water ratio when it leaves the ready-mix plant. However, adding additional water to the concrete at a job site is sometimes necessary to achieve the desired slump for placement. This is often done to ensure the concrete can be placed before it becomes too stiff and difficult to manipulate. It is also important to note that adding water at a job site can lower the concrete’s strength and durability.

Adding water to concrete at the job site is sometimes accomplished using concrete wash water. This is a byproduct of the mixing process and contains many of the same properties of fresh concrete, such as water absorption, cement hydration, and compressive strength. Studies have shown that reusing concrete wash water can save time and money and provide good-quality concrete.

Concrete is a composite material that contains fine powder called cement. It acts as the glue that binds aggregates such as sand and gravel to form a solid mass with a high compressive strength. Cement is made from natural materials such as limestone, shale, and clay. These are crushed and mixed with water and then heated in huge rotary kilns to transform into a substance known as clinker. This is then ground down again to produce a finer material called cement powder, which is transported to companies that use it in construction projects.

The cement that makes up most of the concrete mix is composed of calcium silicate hydrate (CSH), forming a network of tiny pores that interlock to give it remarkable strength. This porosity also helps make concrete resistant to freezing and thawing, deicing chemicals, and water absorption, which could otherwise damage reinforcement steel.

Before the concrete is used on a project, it must be properly proportioned to ensure that all the ingredients react correctly and that the final product has the appropriate strength and consistency. The cement must then be thoroughly mixed with the aggregates and if required, other admixtures before being transported to the construction site, where it is placed in molds or formed into structures.

It is important to note that concrete cannot set or harden until it has been hydrated. It must be protected against direct sunlight, high temperatures, and low humidity.

In most mature markets, cement consumption is closely linked to construction activity, which follows economic development in the local area or country. However, cement can be shipped over long distances by sea and river as plants rationalize production to exploit efficiencies of scale. This can be cheaper than transporting it by land as the cost of fuel per tonne is much higher for trucks than ships or railways.

Aggregates are granular materials that form the foundation for vital construction materials such as concrete and asphalt. The meticulous arrangement of aggregate particles profoundly impacts the durability and longevity of these construction materials, and constructors must have an intimate knowledge of aggregates and their properties to harness them in their intended applications successfully. The main types of aggregate are sand, gravel, and crushed stone. The most common sources of aggregates are natural deposits, waste slag from steel production, and recycled concrete.

The aggregates used in concrete must meet specific quality and size requirements to be incorporated into the finished structure. These requirements include the maximum allowable percentage of harmful material and the particle size distribution, referred to as the aggregate gradation. The optimal aggregate gradation is the key to an economical and durable concrete mix. A good aggregate gradation is also the basis for well-formed concrete, which prevents premature cracking and ensures that the structure will be strong enough to support its intended load.

Achieving an ideal aggregate gradation requires precise measurement of the aggregate particle sizes and careful mixing and proportioning of all the ingredients that go into the concrete. Other important properties of aggregates that influence the final mixture include shape and texture, moisture content, specific gravity, reactivity, and bulk unit weight.

An aggregate’s shape influences its strength, but more importantly, it directly affects the workability of the plastic concrete. Rough, angular aggregates pack tighter and have more surface area than smooth, rounded aggregates. They require a little more cement paste to coat them than rounded aggregates, so mixes containing these coarse aggregates will need slightly higher water-cement ratios.

The maximum aggregate size required depends on the project needs, as defined by the American Association of State Highway and Transportation Officials (AASHTO). However, it is generally preferred that the maximal size be limited to a size that will allow most of the concrete mix to pass through a 10 mm (3/8 inch) sieve. A maximum aggregate height of 20 mm (7/8 inch) is often used for concrete pavements and high-rise buildings.

Concrete can be made by mixing raw ‘ingredients’ – aggregates and cement – together on-site or in a factory. The resulting ready-mixed concrete is then delivered to the construction site in a truck and poured. Concrete can also be precast into blocks, slabs, or other shapes.

Concrete quality depends on several factors, including the mix design (proportions of essential constituents) and the quality of the mixing process. In addition, the mix design should consider the construction location and schedule. This information will affect the choice of a mixer and the mixing method. Many types of mixers and mixing methods exist, and some techniques can vary considerably.

A concrete mixer is a drum-shaped container with fixed paddles attached to the inside surface. When the mixer is turned on, it churns the concrete mixture, causing the constituents to be mixed and dispersed evenly throughout the concrete. Mixing times will be influenced by the mixing method, the order in which the components are loaded, the type of mixer, and the amount of energy used in the mixing cycle.

Hand mixing is preferred for small projects requiring a small concrete batch, such as garden paths and driveways. Using a concrete mixer and hiring a skip is usually more economical for larger jobs. This equipment will have a drum and hopper filled with the dry concrete mix and water. The concrete is then mixed, allowing the water to distribute evenly throughout the mix. When the correct consistency is achieved – the concrete should pack into a ball and crumble easily when touched – it is tipped out of the machine and onto the job site.

Machine mixing of concrete is more efficient than hand mixing and allows larger volumes to be produced. However, the mixer must be correctly positioned to achieve a consistent concrete mixture. A good concrete mix will have a constant slump (the distance the wet concrete swells to when a slump cone is removed) and be workable – not too stiff and soft, with no standing puddles of water.